Changing a marching snare drum head can be a bit of an intimidating process the first few times that you do it.
Knowing what to do, how to do it, and what to expect along the way can significantly improve your experience and results changing a marching snare drum head.
If you already know how to change a marching snare drum head and just want a quick way to freshen up your skills, this tutorial will help you do that as well. It’s always a good idea to expose yourself to new philosophies and methods so that you can continue to enhance your skills as a player or a teacher. In this article you’re going to learn:
Below you will find a step-by-step tutorial that walks you through all of this information visually followed by a written description of each step for you to follow along with. Let's get started!
There are only two essential items that you need to change a marching snare drum head.
The first thing that you obviously need is a new drumhead to replace the old one. The second thing you need is a specialized drum key called a “T-Key.” A T-Key is the same size as a regular drum key but is typically built with stronger materials and has an extended handle to provide you with more leverage for the high tension drumheads found on marching percussion drums. As long as you have those two items, you can successfully change a marching snare drum head.
Two additional items that are helpful but not necessary when changing a marching snare drum head include an old rag and a tube of white lithium grease. The rag is used to wipe off dust and particles from the snare drum so use an old one that you don’t mind getting dirty. While it doesn’t really matter what type of rag you use, you want to make sure that it’s not contaminated with old oil, pain, grease, or any other type of chemical residue.
If you use a rag with these residues in it, they can get find their way into the bearing edge of the drum shell and damage it. In order to avoid this from happening, make sure your rag is a clean rag.
The white lithium grease is put on the bottoms of all of the snare drum tension rods and helps them thread with more ease. This is not a necessary step, but it is a helpful step that makes tuning easier and increases the life span of your snare drum. It may be a minor inconvenience to go to the store and pick up a tube of the grease, but it lasts a long time and will be worth the small cost.
Once you have all of your materials, it’s time to change the marching snare drum head!
The first thing to do is to decide what tension rod you’re going to start with. The reason this is important is because you want to ensure you release the tension from the drumhead evenly and smoothly. In order to do that, you need to remember where you started releasing tension first and keep track of how many times you’ve gone around the drum.
There are multiple methods to use when removing and tuning a marching snare drum. One method suggests that you start on one tension rod and go all the way around the drum in a circle loosening or tightening all of the tension rods in order of the circle. This method does indeed get the job done, but it’s not great for the rim of the snare drum.
Why?
Because if you release tension from one side of the snare drum first, the rim actually raises up since there is less tension holding it down compared to the other side. If you do this too much it actually puts a lot of stress on the rim and can cause it to bend or break.
To avoid this from happening, be sure to tighten tension rods in pairs on opposite sides of the drum from one another. You can find multiple diagrams online for different approaches to this method, but here’s one for your reference:
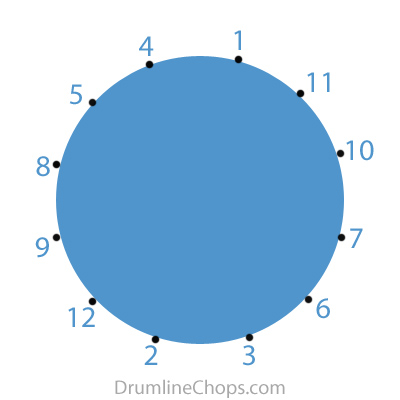
In the diagram above, you’ll see that you start with tension rod number one and then move across the snare drum to tension rod number two. After number two you move one tension rod to the side for number three and then back across the snare drum to tension rod number four.
You repeat this process until you’ve gone through all the tension rods on the snare drum and then start back at number one. This method is a simple way to ensure you are tightening all of the tension rods around the marching snare drum in an even and efficient manner.
Once you have loosened all of the tension rods around the snare drum, grab a hold of both the snare drum rim and the collar of the old marching snare drum head (the collar of the drumhead is the aluminum hoop that holds it in place underneath the rim). When you have a grip on both the snare drum rim and the drumhead collar, simply lift up gently and remove the old head from underneath the rim. That’s it! You’ve successfully removed the old head from your marching snare drum. Now it’s time to clean it up and put a new head on.
Now that you have removed the drumhead from the snare drum, it is time to give the drum a little cleaning.
Since rudimental drumming often requires a decent amount of rim shots and energetic playing, it’s very common for pieces of stick tape, wood chips, and other dirt particles to fall in between the snare drum rim and the marching snare drum head.
With the old snare head removed, grab an old yet clean rag (as we talked about above) and gently wipe down the bearing edge of the drum. This will help remove any particles that interfere with the contact and connection between the shell of the drum and the drumhead itself. After you have cleared off the bearing edge, grab a hold of the rim and take the rag to the inside of the rim.
You can typically do this with the tension rods still in the rim, but if they start to fall out as you wipe down the rim, it is best to remove them all and ensure you don’t lose any of the washers. Once you’ve wiped out the inside of the rim, put the tension rods back in place.
Now that the drum and rim are cleaned, it’s time to place the new drumhead on the snare drum. Every drumhead manufacturer prints a logo on their heads and it’s important to make sure you keep these consistent from drum to drum throughout your drumline.
Why?
The marching percussion activity stems from military roots. A regimented and crisp look is embedded within the culture so it is important to ensure you’re following suite. While you can put logos wherever you want and have them be different on every drum, it’s a good idea to stick with the culture and make them look uniform.
Once you have the head aligned where you would like it to sit on the snare drum, it is time to place the rim on top of it. Allow the rim to naturally settle on top of the drumhead and ensure that all of the tension rods are aligned with their corresponding lug.
At this time, you can add a dab of white lithium grease to the bottom of each tension rod. By doing this, you will ease the friction on the threading between the tension rod and the drum lug. This will help increase the longevity of the snare drum hardware and help make the drum easier to tune under high tensions.
Once you’ve added a little bit of white lithium grease to the end of each tension rod and have started to thread them into the lug casings, it is time to go around and finger tighten all of the tension rods.
The reason it is important to first finger tighten the tension rods is to ensure you’re getting the head to settle in an evenly stretched position.
While it’s hard to do, be sure that you don’t over-tighten any of the tension rods with your fingers. Get each one to a comfortable level, go around the drum a few times, and then stop when all of them are at about an even tension.
Once you’ve balanced the head by finger tightening the tension rods, it’s time go get out the T-Key.
With the T-Key in hand, start in the same position as when you removed the snare drum head and tighten the tension rod one quarter turn. Repeat the process in the same pattern as before while gradually increasing the tension on the head and the pitch of the drum.
After you have gone around a few times and increased the pitch of the snare drum a decent amount, it is time to balance the head again and tune the snare drum. To do this, simply tap around each tension rod two times so that you can hear the pitch of the head in each specific area. If you notice one tension rod sounds lower than the others, raise it a little bit and then start over.
Repeat this process over and over again, making small adjustments in between, until you get all of the tension rods in the same range.
After you have completed your first tuning, the drumhead should be at a moderate pitch and tension level. Let the drum sit for a few hours so that the head can comfortably stretch out and adjust to its new settings.
If you’re in a hurry before a show and you need to crank the head up right away – you need to do what you need to do – but if you have the time to let it sit for a little bit.
After letting the head settle in for a while, you can return to the drum and continue the process of raising the tension and pitch of the snare drum. Once you have gone around two to three times, tune the drum again and balance out the head. When the head is balanced and tuned at a slightly higher pitch, it is time to start playing on it. Either play on it yourself or have a student play on it for a few hours and allow the head to continue settling in. You’ll notice that playing on the head actually caused it to stretch out more and dropped the pitch.
Once the marching snare drum head has been played on for a few hours and this has happened, go through another series of tension raising rotations and then a tuning rotation. Repeat this process for a few days until the head is stretched out and maintains the pitch that you want it to hold. From that point forward, it’s all about occasional tune-ups to maintain your desired pitch and tone quality!
Changing a marching snare drum head can be intimidating the first few times that you do it. However, knowing exactly what to do, how to do it, and what to expect along the way will help eliminate confusion and ensure you do it right the first time.
Be sure to follow the steps within this tutorial on how to change a marching snare drum head to so that you are confident changing a snare drum head and can create your desired sound out of the instrument. If you have any questions along the way, be sure to go over to the facebook page and ask. Our community will be happy to give you answers, advice, and suggestions that will make you more successful. Thanks for checking out this drumline chops tutorial on how to change a marching snare drum head. If you found it useful, please be sure to pass it along to someone else who will benefit from it!


 Recent Posts

Pat McLaughlin is the founder of Drumline Chops. He graduated from the University of North Texas with a degree in music education and is currently the percussion director at West Bloomfield High School.


